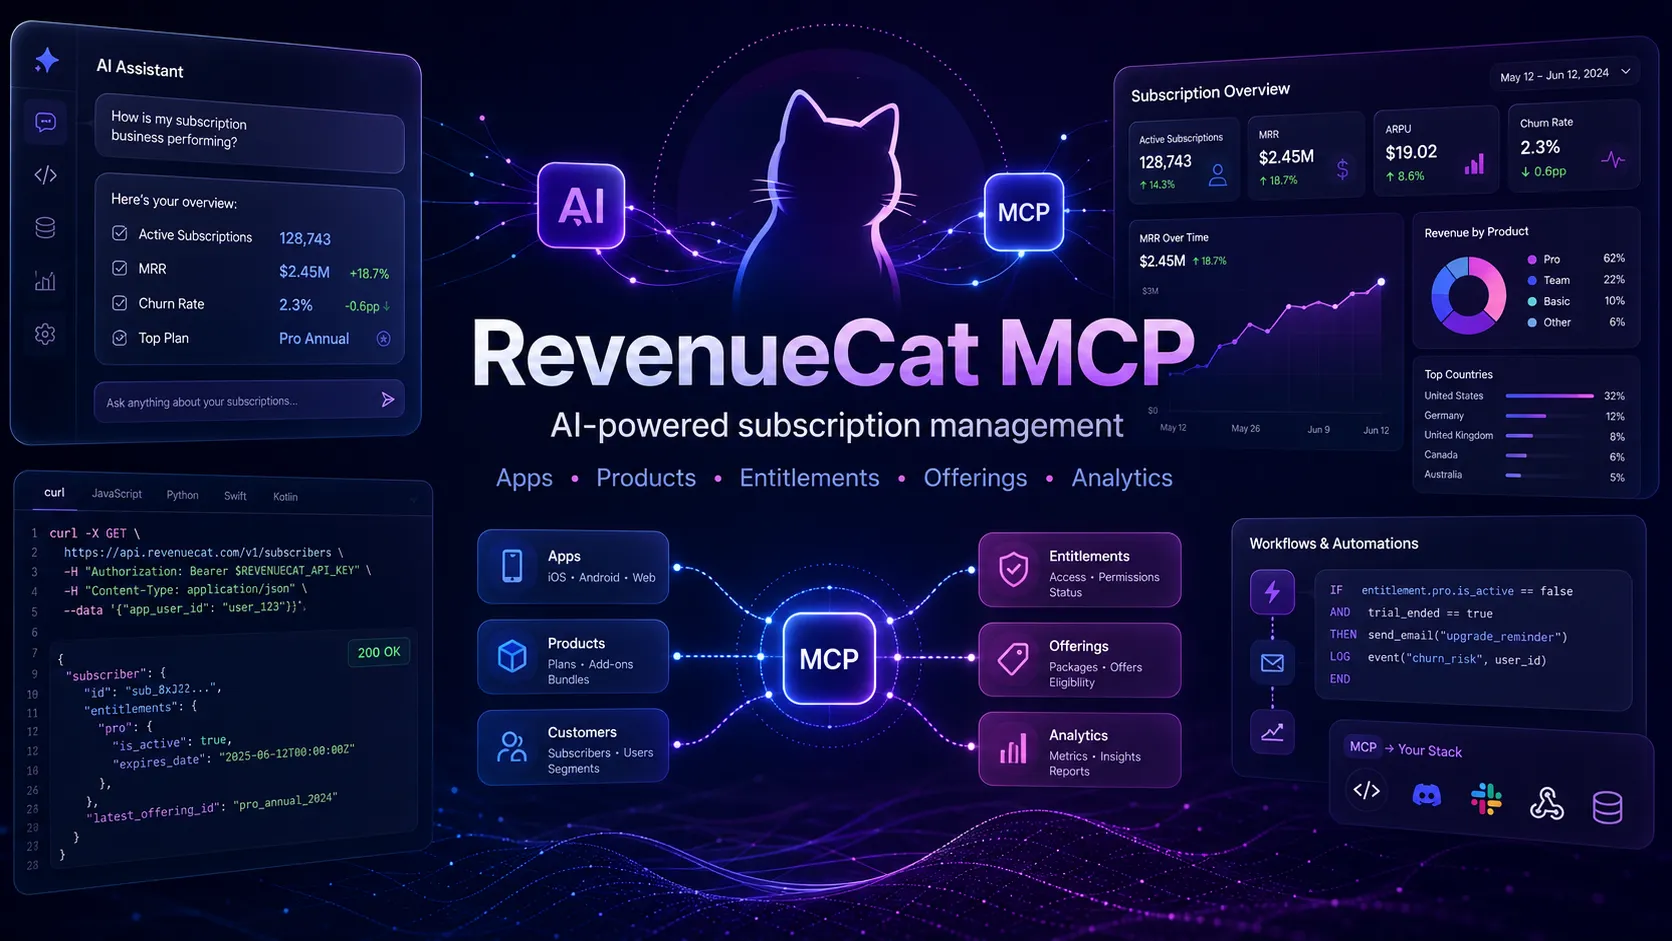
RevenueCat MCP Server
RevenueCat MCP Server lets AI assistants manage RevenueCat subscription infrastructure through natural language, including projects, apps, products, entitlements, offerings, paywalls, and analytics.
Overview
RevenueCat MCP Server is the official Model Context Protocol server for RevenueCat. It gives AI assistants and coding agents a controlled way to interact with RevenueCat subscription infrastructure without relying only on the RevenueCat dashboard.
The server is provided as a cloud-hosted MCP endpoint and can be used by supported AI clients to inspect or manage RevenueCat resources through natural language.
What It Does
RevenueCat MCP acts as a bridge between AI assistants and the RevenueCat API. Once authenticated, an assistant can work with RevenueCat project data and configuration through MCP tools.
Documented capability areas include:
- Project management: access and view RevenueCat project details.
- App management: create, read, update, and delete apps across platforms.
- Product management: manage subscription products and in-app purchases.
- Offering and package management: create and manage subscription offerings.
- Paywall management: create and update RevenueCat paywalls using AI.
- Analytics integration: analyze charts and experiment results.
Use Cases
RevenueCat MCP is useful for developers and app teams that want AI assistants to help with subscription setup, monetization configuration, and troubleshooting.
Common use cases include:
- Inspecting RevenueCat project status from an AI assistant.
- Listing apps, products, offerings, packages, and entitlements.
- Creating platform apps for iOS, Android, and Web projects.
- Creating subscription products, consumables, and one-time purchase products where supported by RevenueCat workflows.
- Connecting products to entitlements.
- Building offerings and attaching packages.
- Retrieving public SDK keys for app integration.
- Reviewing analytics questions such as revenue, active subscribers, trial conversion, and top-performing offerings.
- Troubleshooting broken product relationships, missing entitlements, empty offerings, or configuration issues.
AI Toolkit Integration
RevenueCat also provides the RevenueCat AI Toolkit, a plugin for AI coding assistants. The toolkit includes RevenueCat MCP server configuration plus RevenueCat-specific skills that guide agents through setup, SDK integration, paywalls, purchase flows, testing, analytics, and troubleshooting.
The AI Toolkit is documented for Claude Code, OpenAI Codex, Gemini CLI, and Visual Studio Code. Cursor support is documented as coming soon, with direct MCP server connection recommended in the meantime.
Claude Plugin Marketplace
The RevenueCat Claude plugin is listed as a Claude Code plugin made by RevenueCat. The marketplace listing describes it as a plugin for managing RevenueCat in-app purchase backend configuration directly from Claude Code.
The listing says it connects to the RevenueCat MCP server via OAuth and can manage projects, apps, products, entitlements, offerings, and webhooks. It also describes support for iOS, Android, and Web platforms across subscription, one-time purchase, and consumable monetization models.
Documented Claude plugin workflows include project bootstrapping, product creation, app creation, SDK key retrieval, paywall building, and troubleshooting configuration problems.
Authentication Model
RevenueCat documents two authentication methods for the MCP server:
- OAuth authentication: available for Claude, Codex, Copilot, Cursor, VS Code, and several other clients.
- API v2 Secret Key authentication: supported by all MCP clients.
OAuth uses the signed-in RevenueCat account and grants access based on that account's permissions. API key access depends on the RevenueCat API v2 secret key and its permissions.
Security Notes
RevenueCat recommends creating dedicated API keys for MCP usage, separating keys by environment, using the principle of least privilege, rotating keys periodically, and avoiding production keys in development environments.
Read-only keys are recommended when the agent only needs to inspect data. Write-enabled keys are required when the agent needs to create or modify RevenueCat resources.
RevenueCat also documents that MCP tools may be filtered based on the permissions granted through OAuth or API key. If only read-only access is granted, tools that require write access may not appear.
Troubleshooting Notes
RevenueCat documents OAuth and API key troubleshooting guidance. OAuth errors may happen if an MCP client is not recognized or if a redirect URI is outdated. API key issues may come from an incorrect key, insufficient permissions, a key belonging to the wrong project, or an incorrect Authorization header.
For debugging, RevenueCat recommends testing simple commands such as showing project details, checking key permissions in the RevenueCat dashboard, and reviewing the AI assistant's MCP connection logs.
Limitations
RevenueCat does not document a specific required RevenueCat paid plan for using the MCP server on the setup page.
Platform-specific support depends on the MCP client and the authentication method used. Exact setup is documented for Claude Code, OpenAI Codex, Cursor, VS Code Copilot, Claude Web and Desktop, MCP Inspector, Gemini CLI through the AI Toolkit, and generic unsupported coding environments through skills-only installation.
MCP Setup
Prerequisites
- RevenueCat account required
- Required RevenueCat plan: Not documented
- For OAuth authentication, use a supported MCP client and sign in with a RevenueCat account
- For API v2 Secret Key authentication, create a RevenueCat API v2 secret key
- For manual mcp-remote configurations, Node.js and npx are required
- For Claude Code setup, Claude CLI is required
- For OpenAI Codex setup, Codex CLI or Codex app is required
Access requirements
- OAuth authentication is available for Claude, Codex, Copilot, Cursor, VS Code, and several other clients
- API v2 Secret Key authentication is supported by all MCP clients
- OAuth grants access based on the authenticated RevenueCat account permissions
- Use a write-enabled API key to create or modify RevenueCat resources
- Use a read-only API key if only viewing data
- Tools may be filtered based on granted OAuth or API key permissions
Client setup
Claude Code
Transport: http
claude mcp add --transport http revenuecat https://mcp.revenuecat.ai/mcp
- Open a terminal.
- Run the documented Claude CLI command to add the RevenueCat MCP server.
Auth:
- Authenticate through OAuth when prompted by the MCP client, or use API key authentication if configured by the client.
RevenueCat documents the RevenueCat AI Toolkit as the recommended way to get started with the MCP server.
Claude Code AI Toolkit Plugin
Transport: Not documented
claude plugins marketplace add RevenueCat/ai-toolkit
claude plugins install RevenueCat
claude plugins install revenuecat-play-billing
- From within Claude Code, run
/plugin. - Select
Marketplace. - Select
+ Add Marketplace. - Enter
RevenueCat/ai-toolkit. - Select the
RevenueCatplugin. - Optionally select
revenuecat-play-billingif shipping Android and needing deeper Google Play billing skills. - Alternatively, run the documented command-line plugin installation commands.
Auth:
- The plugin requires authentication with a RevenueCat account via OAuth.
- Depending on the environment, authentication may be prompted immediately, when first using a RevenueCat tool, or manually.
The RevenueCat plugin includes the RevenueCat MCP server setup and cross-platform integration skills. The revenuecat-play-billing plugin adds deeper Google Play subscription lifecycle skills.
OpenAI Codex
Transport: http
codex mcp add revenuecat --url https://mcp.revenuecat.ai/mcp
- Use the Codex CLI command to add the RevenueCat MCP server.
- Alternatively, in the Codex app, open Settings -> MCP Servers -> Add custom server.
- Give it a name.
- Choose Streamable HTTP.
- Enter the URL
https://mcp.revenuecat.ai/mcp. - Click Save.
Auth:
- Authenticate through OAuth when prompted, or use API v2 secret key authentication through manual configuration.
RevenueCat documents that the Codex app, CLI, and IDE Extension share MCP settings. If MCP servers are configured in one, they are automatically adopted by the others.
OpenAI Codex Manual Config
Transport: stdio
macOS/Linux:

[mcp_servers.revenuecat]
command = "npx"
args = ["mcp-remote", "https://mcp.revenuecat.ai/mcp", "--header", "Authorization: Bearer ${AUTH_TOKEN}"]
env = { AUTH_TOKEN = "YOUR_API_V2_SECRET_KEY" }
type = "stdio"
startup_timeout_ms = 20_000

Windows:

[mcp_servers.revenuecat]
command = 'C:\Program Files\nodejs\npx.cmd'
args = ["mcp-remote", "https://mcp.revenuecat.ai/mcp", "--header", "Authorization: Bearer ${AUTH_TOKEN}"]
env = {
    APPDATA = 'C:\Users\USERNAME\AppData\Roaming',
    LOCALAPPDATA = 'C:\Users\USERNAME\AppData\Local',
    HOME = 'C:\Users\USERNAME',
    SystemRoot = 'C:\Windows',
    AUTH_TOKEN = "YOUR_API_V2_SECRET_KEY"
}
type = "stdio"
startup_timeout_ms = 20_000
- Edit the Codex configuration file at
~/.codex/config.toml. - Use the documented macOS/Linux or Windows configuration block.
- On Windows, replace
USERNAMEwith the actual Windows username.
Auth:
- Open the RevenueCat dashboard.
- Navigate to the project's API Keys page.
- Create a new API v2 secret key and copy it.
- Set
AUTH_TOKENto the RevenueCat API v2 secret key.
This manual setup uses mcp-remote through npx and passes the RevenueCat API v2 secret key as a Bearer token.
OpenAI Codex AI Toolkit Plugin
Transport: Not documented
codex plugin marketplace add RevenueCat/ai-toolkit
- Run the documented Codex plugin marketplace command.
- Start Codex.
- Run
/plugins. - Search for
RevenueCat. - Install the plugin.
Auth:
- The plugin requires authentication with a RevenueCat account via OAuth.
- Authentication happens via OAuth in the browser and grants access based on the RevenueCat account permissions.
For the OpenAI Codex desktop app, RevenueCat documents running the same marketplace command, then opening Plugins in the Codex app, selecting RevenueCat from the plugin source dropdown, and clicking the plus button next to the plugin.
Cursor
Transport: http
{
  "servers": {
    "revenuecat": {
      "url": "https://mcp.revenuecat.ai/mcp",
      "headers": {
        "Authorization": "Bearer {your API v2 token}"
      }
    }
  }
}
- Add the RevenueCat MCP server to Cursor using the documented button, or add it manually to
mcp.json. - Use the documented manual
mcp.jsonconfiguration block.
Auth:
- Provide a RevenueCat API v2 token in the Authorization header for the manual configuration.
RevenueCat AI Toolkit Cursor support is documented as coming soon. RevenueCat recommends connecting the RevenueCat MCP server directly in the meantime.
VS Code Copilot
Transport: http
{
  "servers": {
    "revenuecat-mcp": {
      "url": "https://mcp.revenuecat.ai/mcp",
      "type": "http"
    }
  },
  "inputs": []
}
- Add the documented configuration to the Visual Studio Code
mcp.jsonfile.
Auth:
- Use OAuth where supported by the client, or configure API v2 secret key authentication if required.
RevenueCat documents VS Code Copilot setup using an mcp.json configuration.
Visual Studio Code AI Toolkit Plugin
Transport: Not documented
- Plugin marketplace support is currently in beta in Visual Studio Code.
- RevenueCat says to refer to Visual Studio Code instructions for adding the RevenueCat AI Toolkit repository as a plugin marketplace.
- Install the plugin from the marketplace.
Auth:
- The plugin requires authentication with a RevenueCat account via OAuth.
Exact Visual Studio Code plugin marketplace commands are not documented in the RevenueCat AI Toolkit README.
Claude Web and Desktop
Transport: remote MCP
- Use Anthropic custom connectors with a remote MCP server.
- Remote MCP server URL:
https://mcp.revenuecat.ai/mcp. - For Pro and Max individual plans, open Settings -> Connectors.
- In the Connectors section, choose Add custom connector.
- Enter the RevenueCat MCP URL.
- Choose Add.
- Choose Connect and finish authentication when prompted.
- For Team and Enterprise, an Owner or Primary Owner adds the connector under Organization settings -> Connectors -> Add custom connector using the RevenueCat MCP URL.
- Each Team or Enterprise member opens Settings -> Connectors, finds the custom connector labeled Custom, and chooses Connect to authenticate.
Auth:
- Finish authentication when prompted after choosing Connect.
RevenueCat documents that custom remote MCP connectors are in beta on Claude and that free plans can use one custom connector.
MCP Inspector
Transport: Streamable HTTP
npx @modelcontextprotocol/inspector@latest
- Run the documented MCP Inspector command.
- Configure Transport Type as Streamable HTTP.
- Set URL to
https://mcp.revenuecat.ai/mcp.
Auth:
- Use Bearer Token authentication with a RevenueCat API v2 secret key.
RevenueCat documents MCP Inspector for testing and development.
Gemini CLI AI Toolkit Extension
Transport: Not documented
gemini extensions install https://github.com/RevenueCat/ai-toolkit
- Install the RevenueCat AI Toolkit extension directly from GitHub using the documented Gemini CLI command.
Auth:
- The plugin requires authentication with a RevenueCat account via OAuth.
- In Gemini, authentication may be started manually with
/mcp auth revenuecat.
RevenueCat documents that Gemini has no marketplace and supports a single extension per repository, so it installs the RevenueCat plugin only.
Other unsupported agentic coding environments
Transport: Not documented
npx skills add RevenueCat/ai-toolkit
- Use the documented
npx skillscommand.
RevenueCat documents that this only installs skills from the repository, not the MCP server. Configure the MCP server manually in the coding environment using RevenueCat MCP setup instructions.
Other MCP Clients
Transport: http
- Configure the MCP client with the hosted RevenueCat MCP endpoint:
https://mcp.revenuecat.ai/mcp. - Use OAuth if the client supports RevenueCat OAuth.
- Otherwise, use API v2 secret key authentication.
Auth:
- For OAuth, sign in with a RevenueCat account and grant access to the MCP server.
- For API key authentication, create a RevenueCat API v2 secret key and provide it to the MCP client, typically as a Bearer token where supported.
Exact client-specific commands are not documented for other MCP clients.
Authorization flow
- OAuth authentication: log into a RevenueCat account and grant access to the MCP server. Access is based on the authenticated RevenueCat account permissions and covers all projects available to that account.
- API v2 Secret Key authentication: open the RevenueCat dashboard, navigate to the project's API Keys page, create a new API v2 secret key, and provide it to the MCP client configuration.
- Use a write-enabled API key when the agent needs to create or modify resources.
- Use a read-only API key when the agent only needs to view data.
- If OAuth fails with an unknown MCP client error, RevenueCat says the client may not be registered with its OAuth server and recommends contacting RevenueCat support with client details.
- If OAuth fails during redirect or shows an invalid redirect URI, RevenueCat recommends contacting RevenueCat support with the MCP client details and expected redirect URI.
- If API key authentication fails, verify the key is correct, check read/write permissions, ensure the key belongs to the correct project, and update the Authorization header.
Environment variables
[object Object]
Setup docs: https://www.revenuecat.com/docs/tools/mcp/setup
Tags
Related Entries
Keep exploring similar tools and resources in this category.


Related Reads
Background, tutorials, and protocol context connected to this entry.